Object Detection
Haar Cascade Inference
https://docs.opencv.org/4.5.0/db/d28/tutorial_cascade_classifier.html (opens in a new tab)
-
machine learning based approach where a cascade function is trained from a lot of positive and negative images. It is then used to detect objects in other images.
-
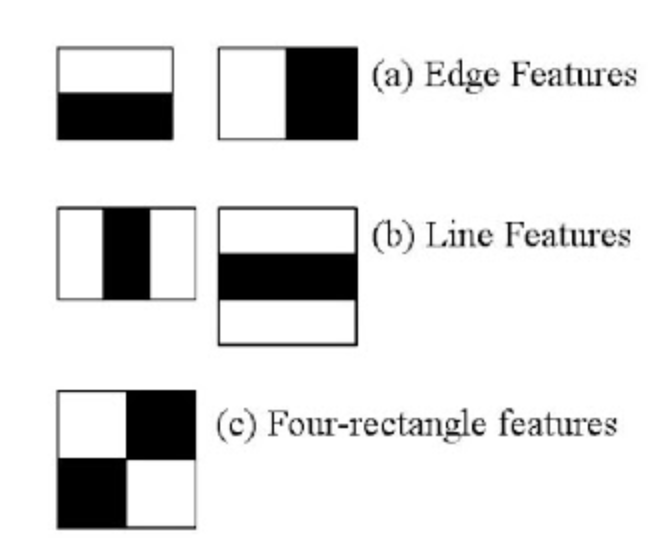
Features extraction using Haar features.
- They are just like our convolutional kernel.
- Each feature is a single value obtained by subtracting sum of pixels under the white rectangle from sum of pixels under the black rectangle.

-
However large your image, it reduces the calculations for a given pixel to an operation involving just four pixels. Nice, isn't it? It makes things super-fast.
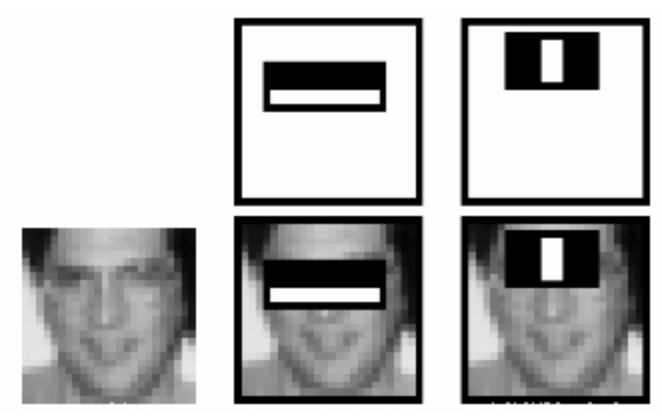
- But among all these features we calculated, most of them are irrelevant
- The same windows applied to cheeks or any other place is irrelevant
- So how do we select the best features out of 160000+ features? It is achieved by Adaboost

-
For this, we apply each and every feature on all the training images. For each feature, it finds the best threshold which will classify the faces to positive and negative.
- Obviously, there will be errors or misclassifications. We select the features with minimum error rate, which means they are the features that most accurately classify the face and non-face images
- The final classifier is a weighted sum of these weak classifiers.
-
In an image, most of the image is non-face region.
- So it is a better idea to have a simple method to check if a window is not a face region.
- For this they introduced the concept of Cascade of Classifiers. Instead of applying all 6000 features on a window, the features are grouped into different stages of classifiers and applied one-by-one.
- If a window fails the first stage, discard it.
- The authors' detector had 6000+ features with 38 stages with 1, 10, 25, 25 and 50 features in the first five stages
-
full script
from __future__ import print_function
import cv2 as cv
import argparse

def detectAndDisplay(frame):
    frame_gray = cv.cvtColor(frame, cv.COLOR_BGR2GRAY)
    frame_gray = cv.equalizeHist(frame_gray)
    #-- Detect faces
    faces = face_cascade.detectMultiScale(frame_gray)
    for (x,y,w,h) in faces:
        center = (x + w//2, y + h//2)
        frame = cv.ellipse(frame, center, (w//2, h//2), 0, 0, 360, (255, 0, 255), 4)
        faceROI = frame_gray[y:y+h,x:x+w]
        #-- In each face, detect eyes
        eyes = eyes_cascade.detectMultiScale(faceROI)
        for (x2,y2,w2,h2) in eyes:
            eye_center = (x + x2 + w2//2, y + y2 + h2//2)
            radius = int(round((w2 + h2)*0.25))
            frame = cv.circle(frame, eye_center, radius, (255, 0, 0 ), 4)
    cv.imshow('Capture - Face detection', frame)

parser = argparse.ArgumentParser(description='Code for Cascade Classifier tutorial.')
parser.add_argument('--face_cascade', help='Path to face cascade.', default='data/haarcascades/haarcascade_frontalface_alt.xml')
parser.add_argument('--eyes_cascade', help='Path to eyes cascade.', default='data/haarcascades/haarcascade_eye_tree_eyeglasses.xml')
parser.add_argument('--camera', help='Camera divide number.', type=int, default=0)
args = parser.parse_args()
face_cascade_name = args.face_cascade
eyes_cascade_name = args.eyes_cascade
face_cascade = cv.CascadeClassifier()
eyes_cascade = cv.CascadeClassifier()

#-- 1. Load the cascades
if not face_cascade.load(cv.samples.findFile(face_cascade_name)):
    print('--(!)Error loading face cascade')
    exit(0)
if not eyes_cascade.load(cv.samples.findFile(eyes_cascade_name)):
    print('--(!)Error loading eyes cascade')
    exit(0)
camera_device = args.camera

#-- 2. Read the video stream
cap = cv.VideoCapture(camera_device)
if not cap.isOpened:
    print('--(!)Error opening video capture')
    exit(0)
while True:
    ret, frame = cap.read()
    if frame is None:
        print('--(!) No captured frame -- Break!')
        break
    detectAndDisplay(frame)
    if cv.waitKey(10) == 27:
        break
Haar Cascade Training
https://docs.opencv.org/4.5.0/dc/d88/tutorial_traincascade.html (opens in a new tab)
-
The
opencv_traincascadesupports both HAAR like wavelet features [248] (opens in a new tab) and LBP (Local Binary Patterns) [140] (opens in a new tab) feature- LBP features yield integer precision in contrast to HAAR features, yielding floating point precision, so both training and detection with LBP are several times faster then with HAAR features.
-
We need a set of positive samples (containing actual objects you want to detect) and a set of negative images (containing everything you do not want to detect).
- The set of negative samples must be prepared manually, whereas set of positive samples is created using the
opencv_createsamplesapplication.
- The set of negative samples must be prepared manually, whereas set of positive samples is created using the
-
Negative samples may be of different sizes.
- However, each image should be equal or larger than the desired training window size (which corresponds to the model dimensions, most of the times being the average size of your object)
- These images are used to subsample one negative image into several image samples having this training window size.
-
2 ways of generating positive samples
- Generate a bunch of positives from a single positive object image.
- Supply all the positives yourself and only use the tool to cut them out, resize them and put them in the opencv needed binary format (better)
-
100 real object images, can lead to a better model than 1000 artificially generated positives, by using the
opencv_createsamplesapplication -
Structure
/img
  img1.jpg
  img2.jpg
info.dat
info.dat
img/img1.jpg 1 140 100 45 45 img/img2.jpg 2 100 200 50 50 50 30 25 25 -
The manual process of creating the
infofile can also been done by using the opencv_annotation tool.- This is an open source tool for visually selecting the regions of interest of your object instances in any given images.
- The project need to be build (git clone)
opencv_annotation --annotations=/path/to/annotations/file.txt --images=/path/to/image/folder/
-
Next step is to train the model:
opencv_traincascade -
Visualize the classifier with
opencv_visualisation --image=/data/object.png --model=/data/model.xml --data=/data/result/